Showing posts with label Ampeg Bass Amplifier. Show all posts

Friday, August 3, 2012

Ampeg SVT1000 Bass Head Amplifier

Price List Rp.13.420.000
Ampeg SVT1000 Bass Head Amplifier
Huge power for the big venues!
The Ampeg SVT1000 Bass Head is a 1,000W (at 4 ohms) solid state bass amplifier head featuring a 9-band graphic EQ in addition to a 3-band parametric. The Ampeg SVT1000 also features a 5-way switch for instant EQ shifts in the midrange frequencies. Built-in limiter with a defeat switch. Bass amp head back panel has both Neutrik Speakon and 1/4" speaker outs.
Features

  • Solid state
  • 1,000W @ 4 ohms
  • 3-band parametric EQ
  • 9-band graphic EQ
  • 5-way mid-shift switch for instant tonal changes
  • Built-in limiter with defeat switch
  • Neutrik Speakon and 1/4" speaker outs
  • Dual inputs for passive/active instruments
  • Effects loop with front-panel mix knob

Specification:
Dimensions:
27-1/2" x 18-1/2" x 16-1/2"
Weight:
65 lbs.
Equalizer:
3 Band Parametric with Ultra-Mid; 9 Band Graphic with In/Out Switch
Inputs:
Dual Inputs 0dB and -15dB for Active Basses
Limiter:
Built-in with Defeat Switch
Effects Loop:
1/4" Tip-Ring-Sleeve with Effects Mix Knob on Front Panel
Outputs:
1/4" and Neutrik Speakon Outputs

Monday, March 19, 2012

Ampeg SVT-8PRO Bass Head

 
Price List Rp.26.400.000
Ampeg SVT-8PRO Bass Head
When only the best will do, turn to the SVT-8PRO for ultimate power and massive Ampeg tone. The SVT-8PRO combines our vintage SVP-CL preamp with a 2500-Watt Solid-State power amp for Earth-shaking bass that just won’t quit. Loaded with professional features throughout, the SVT-8PRO was designed for the most demanding player and the most demanding of gigs.

An outstanding feature, unique to the SVT-8PRO, is its power reduction circuitry, which allows players to dial in classic SVT overdriven tones at any volume level. This means you can get all the crunch and grind of an SVT pushed to the limit, but at a volume level that won’t set off local seismic detectors.


Our 5-position Ultra Low selector gives you low frequency tone-sculpting capability like never before. From the fattest low-end to tight, highly articulated punch, the choice is yours. And the built-in DI can patch you right into the front of house, although you probably won’t need it! Bottom line: SVT tone at concert volume levels, in a lightweight 23-pound package.
  • Tube Preamp, Solid-State Power Amp
  • 2500-Watts RMS @ 2 ohms, 1300-Watts RMS @ 4 ohms
  • Power Reduction Circuit
  • Effects loop
Specification:
Preamp:
Tube (2 x 12AX7, 1 x 12AU7)
Power Amp:
Solid-State
RMS Power Output:
2500-Watts @ 2 ohms
RMS Power Output:
1300-Watts @ 4 ohms
RMS Power Output:
800-Watts @ 8 ohms
Tone Controls:
Bass, Mid, Treble
Mid Tone Control:
5-Position
Ultra Low/High:
Yes - 5-Position Ultra Low
Balanced Line Out:
Yes (Transformer)
Effects Loop:
Yes
Preamp Out/Power Amp In:
Yes
Other:
Power Reduction Circuit, Mute Button
Dimensions (W x H x D inches):
19 x 3.5 x 14
Weight:
23 pounds 

Ampeg SVT-7PRO Bass Head

Price List Rp.10.995.000
Ampeg SVT-7PRO Bass Head
The SVT-7PRO pumps out a ferocious kilowatt of pure Ampeg tone in a compact design that weighs in at just 15lbs. The SVT-7PRO features the same professional features as the other PRO Series heads including a flexible 5-position mid tone control, remote switching FX loop and a sleek onboard variable compressor. The tube preamp boasts a premium JJ 12AX7 that feeds the weight-defying Class-D power section. Sure it’s portable and yes, it’s small…but it can power everything from a small single PN-115HLF up to a monster Heritage SVT-810E. And at 80 cents a watt, the value is undeniable.


Features:
RMS power output: 
1000 watts @ 4 ohms
600 watts @ 8 ohms
Preamp:
Tube ( 1 × JJ 12AX7)
Power amp:
Class D
Tone controls:
Bass, mid, treble
Mid-tone control:
5-position
Ultra Lo/Hi boosts
Onboard variable compressor
Transformer balanced line out
Includes removable rack ears
Power supply:
Switching
Weight:
15.5 lbs / 7 kg

Tuesday, March 6, 2012

Ampeg Bass Amplifier BA-108

Price List Rp.1.385.000
Ampeg BA-108 Combo Bass Amplifier 
Whole Lotta Little Love
The 25-watt Ampeg BA-108 bass combo is perfect for beginning bassists, offering tools like 3-band EQ, CD/MP3 input and a headphone out for silent practice. The high-output 8˝ speaker is housed in an ultra-rugged cabinet with a ported baffle for excellent low frequency extension.
Specification:

  • RMS power output: 25 watts
  • Speaker configuration: 1 x 8˝
  • Preamp: Solid-state
  • Power amp: Solid-state
  • Tone controls: 3-band EQ
  • Line output: Yes
  • MP3/CD input: Yes
  • Headphone output: Yes
  • Dimensions (H x W x D inches): 15.3 x 15.3 x 11
  • Handling weight: 27 lbs / 12.2 kg

Thursday, March 1, 2012

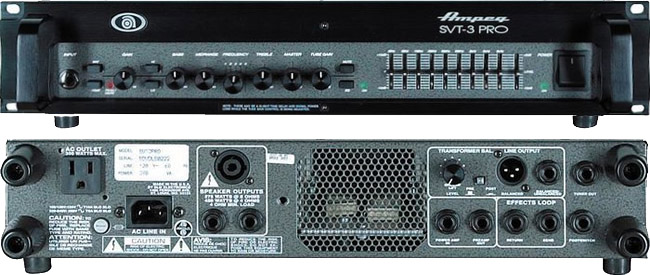
Ampeg SVT-3Pro Bass Head Amplifier

Price List Rp.11.650.000
Ampeg SVT-3Pro Bass Head Amplifier
The sound is in your head. You've played countless instruments in search of the ultimate soul mate. Now you need an amp that will speak your sound to the audience. That’s where the SVT-3PRO comes in. There’s a reason this amp is a best seller—it delivers the goods! With up to 450 watts and the sweet sound of tubes, the SVT-3PRO is the top choice of rockers and funkmeisters around the globe.

It’s all about tone. The SVT-3PRO’s Frequency control allows you to select the center frequency for the Midrange control, giving you a choice of five distinct “voices” for the Midrange. The center frequencies are 220Hz, 450Hz, 800Hz, 1.6kHz and 3kHz. And if that’s not enough, you can use the 9-Band Graphic EQ to custom tailor your sound even more. Or use the EQ to set up a footswitchable “second channel” for your show-stopping bass solo.

The SVT-3PRO offers SVT tone and performance (with a few modern enhancements) in a convenient rackmount design. Moderate size, significant power and genuine Ampeg Round Sound… everything a serious bassist needs. Dozens of the world-class artists depend on the SVT-3PRO to get the job done, day in and day out.

Feature:
  • Tube Drive Control
  • 1/4” and Neutrik Speakon® Outputs
  • Input Peak LED
  • Input Pad and Bright Switch
  • Mute Switch and Tuner Out

Monday, February 13, 2012

Ampeg Portaflex PF-115HE Cabinet

Price List Rp.5.495.000
Ampeg Portaflex PF-115HE Cabinet
Heavyweight Stories, Lightweight Design
Portable, powerful and affordable, Ampeg’s Portaflex Series combines the vintage styling of Ampeg’s iconic flip-top cabinet design with a selection of modern, powerful heads. The lightweight PF-350 and PF-500 heads match perfectly with either the PF-115HE or PF-210HE cabinets. The flip-top design allows you to store your head, cables, etc. right inside the enclosure for ultimate portability. Covered in sleek black diamond tolex and featuring premium Eminence® speakers, the genuine Ampeg look and tone are unmistakable. Plus, modern features like the onboard compressor/limiter and switching power supplies are sure to please any professional. Heavyweight history in a lightweight design — Ampeg Portaflex Series. 

Drawing from the classic design of Ampeg’s legendary Portaflex cabinets, the PF-115HE combines vintage styling with the performance of a modern 450W cab. The Eminence® 15˝ driver pushes out true Ampeg tone. Since it’s a Portaflex, you can attach any PF Series head to the top, flip it inside and hit the road Ampeg style. 

Vintage Design

Inspired by the iconic B-15, Portaflex Series delivers the vintage styling of the original in modern designs for today’s bassists. The grille cloth, sleek black diamond Tolex and flip-top functionality are straight from Ampeg’s legendary history.


Modern Features

The two high-power Portaflex heads deliver the power demanded on today’s stages. Both ultra-compact and lightweight heads provide useful tools like onboard limiting, a dedicated DI and FX loops, either head is perfect for your next gig.


Flexible & Portable
Mix and match your head and cab to create the perfect, portable Portaflex rig. Ideal for anyone who takes their gear from show to show, you just take off the top, store your cables and pedals inside and flip the top back on for transport.
Specification:
  • Vintage Portaflex flip-top cabinet design with Black diamond tolex, Vintage B-15 grille cloth & Rugged 15mm poplar ply enclosure
  • 450W RMS power handling @ 8 ohms
  • 1 x 15˝ ceramic Eminence® LF driver
  • 1˝ HF compression driver w/L-Pad level control
  • Frequency response: 44 Hz – 17 kHz
  • Sensitivity: 99.5 dB SPL @ 1w/1m
  • Dimensions (H x W x D inches): 23 x 21 x 14
  • Handling weight: 45 lbs / 20.4 kg

Thursday, August 11, 2011

Ampeg B2RE B410 HE Head cabinet

Price List
B2R-E Head  Rp.6.800.000
B410-HE Cab Rp.5.495.000

Ampeg B2RE B410HE Head cabinet
Our Most Popular Bass Head
B Series solid-state amps crank out extreme wattage and feature optocoupler limiters, effects loops, and XLR balanced line outputs. All B Series enclosures offer custom LF drivers and compression horn drivers with Level control.

The new Ampeg B2-RE replaces our ever-popular B-2R, delivering up to 450-watts @ 4 Ohms—and the high-current Neutrik Speakon® jack means that every single drop of that power will make it to your speakers. Since volume and tone should go hand-in-hand, we equipped the B2-RE with our superb tone-sculpting Ultra Mid control, which provides a new level of tonal fine-tuning that should satisfy even the most demanding player.


Want even more control? 
Use the 9-Band Graphic EQ to custom tailor your sound to the room, or use it as a “second channel" to boost your level for that show-stopping bass solo. Four hundred and fifty watts of pure bass energy, total tone control and rugged construction make the B2-RE a true performer's bass amp.
Input Pad Switch
Peak LED Input Indicator
Defeatable Limiter
Variable Speed Fan
1/4" and Neutrik Speakon® Outputs

Specifications:
  • RMS Power Output (4 ohms): 450-Watts 
  • RMS Power Output (8 ohms): 250-Watts 
  • Preamp: Solid State 
  • Power Amp: MOSFET
  • Tone Controls: 3-Band
  • Mid Tone Control: Ultra Mid 
  • Graphic EQ: Yes, 9-Band 
  • Balanced Line Out: Yes, with Pre/Post and Pad
  • Effects Loop: Yes 
  • Preamp Out/Power Amp In: Yes
  • Dimensions (W x H x D inches): 19 x 3.5 x15
  • Weight: 26 Pounds

Thursday, June 16, 2011

Ampeg SVT-VR Vintage Reissue

Price List Rp.20.550.000
Ampeg SVT-VR Vintage Reissue
Tubes, tubes, and more tubes! The new Ampeg SVT-VR is a vintage reissue of an early 1970s “Blue-Line” SVT head. The preamp stage, power section, and even rocker switches emulate the exact signal path, tone, and vibe of the original rock ’n’ roll workhorse. Authentic from its input jack all the way to its six 6550 output tubes, the SVT-VR is a must-have for rockers seeking that in-your-face Ampeg bass tone.
Features:
  • Tube Preamp and Power Amp
  • 300-Watts RMS @ 2 or 4 Ohms
  • Two Discrete Channels
  • Neutrik Speakon® and 1/4" Output
Specifications:


Saturday, May 7, 2011

Ampeg SVT 450 H Head

Price List Rp.8.370.000
Ampeg SVT450H Bass Head
In the world of high performance bass amps, the Ampeg SVT-450H gives you more power, performance and flexibility than any other bass amp in its class. And if we didn’t tell you, you’d swear the SVT-450H was a tube amplifier. Producing warm, tube-like performance at stunning volume levels (it’s rated at 450-Watts RMS at 4 Ohms), the SVT-450H uses MOSFET technology and offers a full complement of professional features, such as: Optocoupler Limiters, which prevent unwanted power amp distortion, no matter how loudly you play; and an onboard 9-Band Graphic EQ that allows you to sculpt a tone that is second to none. In spite of all these amazing features, the SVT-450H is still our most affordable bass head.
Control panels:
  1. 0dB (INPUT): The signal output from an instrument (active or passive) or a line level signal may be connected here by means of a shielded instrument cable.
  2. PAD: This switch, when depressed, attenuates the input signal by 15dB. Attenuation allows the Gain control (#4) to be used in a more usable (higher) position. If clipping is indicated with the Gain control way down, attenuation is needed.
  3. PEAK: This LED illuminates when the signal level into the preamp (excluding the Graphic EQ) approaches clipping. Adjust the Gain control (#4) until a strong signal from your instrument causes this LED to flicker. NOTE: If the LED illuminates frequently with the Gain at a low setting, use the Pad (#2) to attenuate the signal and readjust the Gain.
  4. GAIN: Use this control to adjust the level of the signal entering the preamp stage. Adjust this control until the Peak LED (#3) flashes on strong signal peaks (but is not illuminated constantly while playing). To obtain the best signal to noise ratio, set the Gain control as described above and adjust the Master control (#8) to obtain the desired volume level.
  5. BASS: Use this control to adjust the low frequency level of the amplifier. This control provides 15dB of cut or 13dB of boost at 40Hz. The low frequency output is flat at the center position.
  6. ULTRA MID: Use this control to adjust the midrange frequency level of the amplifier. This control provides 13dB of cut or 5dB of boost at 400Hz. The midrange frequency output is flat at the center position. Rotate the control counter clockwise for a “contoured”sound (more distant, less midrange output) or clockwise for a sound which really cuts through.
  7. TREBLE: Use this control to adjust the high frequency level of the amplifier. This control provides 21dB of cut or 16dB of boost at 8kHz. The high frequency output is flat at the center position.
  8. MASTER: Use this control to adjust the overall output level of the amplifier. For the lowest possible noise level, adjust the Gain control as described in #4 and use this control to obtain the desired volume level. The Effects Loop and Balanced Out (#20 - 24) are not affected by the Master control.
  9.  LIMIT: The SVT450H uses an internal Optocoupler Limiter to assist in keeping the amplifier’s output “clean” at extreme volume levels. (All amplifiers may begin to clip their output signals as they approach maximum output levels, resulting in potentially damaging distortion.) To engage the Limiter, depress this switch. The adjacent LED illuminates when the limiter circuit is activated, indicating that the amplifier is nearing full output and the limiter is keeping peak signals from clipping the output.
  10. EQ ON: This switch, when depressed, activates the Graphic EQ. The adjacent LED illuminates when the EQ is active.
  11. GRAPHIC EQUALIZER: Use these sliders to control the amplitude of the frequencies indicated below each control. The center position of each control is flat: sliding the control upward increases the output level of that frequency; sliding the control downward decreases it.
  12. ON: This LED illuminates when the amplifier is on.
  13. POWER: Use this switch to turn the amplifier on (top of the switch depressed) and off (bottom of the switch depressed).

  14. (FAN): The temperature controlled, variable speed fan draws cool air into the amplifier and forces heat out through the exhaust vents (also on the rear panel, between the speaker jacks and the power amp in jack). Do not obstruct the fan or vent hole openings.
  15. (FUSE): The fuse helps protect the unit from damage due to overload conditions. If the fuse fails, replace it only with the same size and type. If the fuse fails repeatedly, check the line voltage or contact an Ampeg Service Center.
  16. AC LINE IN: Firmly insert the supplied AC power cord into this socket until it is fully seated. This grounded power cord is to be plugged into a grounded power outlet, wired to current electric codes and compatible with voltage, power, and frequency requirements stated on the rear panel. Do no attempt to defeat the safety ground connection.
  17. SPEAKERS: The 1/4” jacks offer a convenient method of connecting to speaker cabinets using cables terminated with 1/4” plugs. However, when using the amplifier at or near its full output power, using the Speakon® jack is recommended. (Pin 1+ = hot, pin 1- = return.)
    NOTE: When connecting multiple speaker cabinets to the amplifier, keep the overall impedance at or above 4 ohms. The following chart shows the total impedance load when connecting speaker cabinets in parallel:
  18. POWER AMP IN: This mono jack allows you to feed the preamp output of another amplifier to the input of the SVT450H’s internal power amp. This bypasses the preamp circuitry of the SVT450H.
  19. PREAMP OUT: A post-EQ signal from this jack may be sent to the house mixing board, recording console, or an external amplifier.
  20. EFFECTS RETURN: Use this jack to connect the output signal from an external effect to the amplifier by means of a shielded signal cable.
  21. EFFECTS SEND: Use this jack to send a signal to the input of an external effect by means of a shielded signal cable.
  22. -20dB/0dB: This switch, when depressed, attenuates the signal at the Bal. Out jack (#24) by 20dB.
  23. POST/PRE: This switch, when depressed, sends a post-EQ signal to the Bal. Out jack (#24). When this switch in the out position, the signal at the Bal. Out jack (#24) is pre-EQ.
  24. BAL. OUT: This XLR connector provides a balanced preamp output signal for connecting to the house mixing board, a recording console, or an external amplifier with balanced inputs. The signal at this jack can be set to be pre or post EQ by means of the Post/Pre switch (#23). The level of the signal can be adjusted for mic or line type inputs by means of the -20dB/0dB switch (#22).
Specification:

Saturday, April 30, 2011

Ampeg B4R

Price List Rp.11.925.000
Ampeg B4R Head
At 1000watts, the Ampeg B4R is the most powerful amp in its class. Everything you need for today's music...Ultra-Mid circuitry, texture tube emulation, stereo/mono bridge operation, limiter and more. Let's get ready to rumble!
Straight-ahead power and tone so you can rock like a world class act—even before the royalty checks roll in. The 1000-watt B-4R is the most powerful head in its class. Introduced by Ampeg in 1999, this powerhouse head gives you everything you need for today's music. Not only is the B-4R powerful, it's loaded with tone-shaping features like nothing you've ever experienced.

The 9-Band Graphic EQ can either be used to custom tailor your sound to the room, or it can be used to set up a “second channel" for your show-stopping bass solo. In addition to B-4R's five-position Style switch, the Ultra Mid control provides tonal fine-tuning that should satisfy even the most finicky player. And if you want to really push the envelope, just engage the Texture switch to activate our patented tube emulation circuitry. The ultimate biamped bass head—the Ampeg B-4R.
B Series solid-state amps crank out extreme wattage and feature optocoupler limiters, effects loops, and XLR balanced line outputs. All B Series enclosures offer custom LF drivers and compression horn drivers with Level control.
Control panels
:


  1. 0dB INPUT: The signal output from an instrument (active or passive – typically passive) or a line level signal may be connected here by means of a shielded instrument cable. The signal at this jack is sent into the preamp at full amplitude.
  2. -15dB INPUT: The signal output from an instrument (active or passive – typically active) or a line level signal may be connected here by means of a shielded instrument cable. The signal at this jack is padded 15dB before it is sent into the preamp.
  3. MUTE: This switch, when depressed, mutes all outputs except the Tuner Out (#41). A footswitch can also control muting if the Mute switch on the front panel is left in the “out”position. (The front panel switch is still active with a footswitch connected.) This is excellent for tuning your bass with an electronic tuner without having to adjust any levels or turn down your house volume.
  4. TEXTURE: This switch adds a “tube emulation” stage which changes the tone for a more aggressive sound. Using the Texture switch, you can overdrive the amplifier without typical (and harsh-sounding) solid state clipping.
  5. GAIN: This control sets the level of the signal entering the preamp stage. Adjust this control until the Peak LED (#6) flashes on strong signal peaks (but is not illuminated constantly while playing). To obtain the best signal to noise ratio, set the Gain control as described above and adjust the Master (#14) to obtain the desired volume level.
  6. PEAK LED: This LED will illuminate when the signal entering the preamp stage is near the clipping level. Adjust the Gain control (#5) until a strong signal from your instrument causes this LED to flicker.
  7. STYLE: This five-position switch allows you to vary the tone of the amplifier. The following table lists each of the different settings – experiment with the Style and other EQ controls (#8,9,10,18,19) for the results which suit you best.
    POSITION 1: Fully “scooped” mids (mid cut)
    POSITION 2: Traditional passive tone setting
    POSITION 3: Basically flat
    POSITION 4: Boosted high end
    POSITION 5: Basically flat with low end roll off – for loud playing without “muddiness”
  8. BASS: This is the primary low frequency control which allows 12dB of cut or boost at 50Hz. The low frequency output is flat at the center position.
  9. ULTRA MID: This is the primary midrange control which allows 7dB of cut at 400Hz or boost at 800Hz. The midrange output is flat at the center position.
  10. TREBLE: This is the primary high frequency control which allows 18dB of cut or boost at 5kHz. The high frequency output is flat at the center position.
  11. EFFECTS MIX: This control varies the mix between the direct (dry) signal and the effects (wet) when the effects loop (#39,40) is used. Full counterclockwise results in all direct signal (no effect) and full clockwise gives all effect and no direct signal. The clockwise position is equivalent to a series effects loop and should be used with such devices as limiters and equalizers.
  12. GRAPHIC EQ: This switch activates the graphic equalizer.When a foots witch is used, this switch is disabled.
  13. LIMIT DEFEAT: The B4R employs internal limiter circuits to help keep the power amplifier’s output clean at extreme volume levels. (All amplifiers may begin to clip their output signals as they approach maximum output levels, resulting in potentially speaker-damaging distortion.) These circuits may be disabled by depressing this switch. This may result in an increase in output power, but also increases the possibility of distortion. Use discretion whenever playing with the Limit circuits off.
  14. MASTER: This control sets the overall output level of the amplifier. For the lowest possible noise level, adjust the Gain control as described in #5 and use this control to obtain the desired volume level.
  15. LIMIT LED: This LED will flash any time the internal limit circuit is called upon to keep the amplifier’s output signal clean. This indicates that the amplifier is nearing full output and the limiter is keeping it from clipping the output signal.
  16. FREQUENCY: This control sets the crossover point between the Biamp High and Biamp Low Outputs when using the amplifier in the biamp mode.
  17. BALANCE: This control adjusts the relative level between the low and high frequency biamp signals when using the amplifier in the biamp mode.
  18. 9-BAND GRAPHIC EQ: These sliders control the amplitude of the frequencies indicated above each control. The center position of each control is flat: sliding the control upward will increase the output level of that frequency; sliding the control downward will decrease it. The Graphic EQ can be used in two ways: 1) To fine tune your sound, make small adjustments at the desired frequencies and leave the EQ on throughout the entire session. (This is great for adapting to varying room acoustics when going from club to club, etc.) 2) For a completely different sound, make larger adjustments and only activate the EQ when you want a “second channel” sound (such as during bass solos).
  19. LEVEL: This is the output volume control for the Graphic EQ and only affects the signal when the EQ is engaged. If the EQ’d signal is too soft, slide the Level control up; if it’s too loud, slide the control down.
  20. POWER LED: This LED glows green when the Power switch (#22) is ON.
  21. ACTIVE LED: This LED illuminates when the EQ is on.
  22. POWER: This heavy-duty rocker switch applies the power to the amplifier: the amp is ON when the top of the switch is depressed, OFF when the bottom of the switch is depressed.

  23. CIRCUIT BREAKER: The B4R employs an AC line circuit breaker to help protect against damage due to excessive current demands. If the amplifier stops working, check the circuit breaker. If it has opened, the button will be protruding and showing a contrasting color. You can reset the circuit breaker by pushing it in until it latches. The breaker must cool down for a short time before the button will latch. If the circuit breaker opens repeatedly, have the amplifier checked by a qualified service person.
  24. AC LINE IN: Firmly insert the supplied AC power cord into this socket until it is fully seated. Plug the male end of the cord into a grounded AC outlet. DO NOT DEFEAT THE GROUND PRONG OF THE AC PLUG!
  25. SPEAKER OUTPUTS: The 1/4” jacks offer a convenient method of connecting to speaker cabinets using cables terminated with 1/4” plugs. However, when using the amplifier at or near its full output power, using the five-way binding posts (domestic units) or Speakon® jacks (export units) is recommended. The binding posts/Speakon® jacks must be used when operating in the Mono Bridged mode. (See pages 8 and 9.)
  26. FULL RANGE/BIAMP: This switch determines how the signal is sent to the internal amplifiers. In the Full Range position (switch out), a full range signal is sent to both amp channels. In the Biamp position (switch in), the low frequencies are sent to Channel A and the high frequencies are sent to Channel B. (See pages 8 and 9.) NOTE: When Biamping, the Stereo/Mono switch (#27) must be set to Stereo. (See pages 8 and 9.)
  27. STEREO/MONO: This switch sets the operating mode of the amplifier. In the “out” position the amplifier is in the Stereo Mode; with the switch in the “in” position the amplifier is in the Mono Bridged Mode. (See pages 8 and 9.)
  28. POWER AMP INPUTS: These jacks connect directly to the power amp for use with external preamps. When using external sources, connect the OUTPUT of the sources to these jacks using shielded instrument cables to feed the signals into the power amp sections. The internal signal is disconnected when a plug is inserted. In the Mono Mode, Channel A = Input. In the Biamp Mode, Channel A = Low Input, Channel B = High Input. (See pages 8 and 9.)
  29.  PREAMP OUTPUTS These jacks are direct preamp outputs for use with external power amplifiers, mixing boards, external effects, etc. Connect the external unit inputs to these jacks using shielded instrument cables.
  30. See 28
  31. See 29
  32. FOOTSWITCH: Connect a two button footswitch to this jack for remote Mute and EQ On/Off control. On the stereo 1/4” plug, the tip controls Mute and the ring controls EQ On/Off. When a footswitch is connected, the Mute switch (#3) can still be used; however, the EQ switch (#12) is disabled.
  33. BIAMP HIGH/LOW OUTPUTS: When using the amplifier in the biamp mode, the Biamp High Out jack carries the high frequency signal and the Biamp Low Out jack carries the low frequency signal. (See pages 8 and 9.)
  34. LINE OUT LEVEL: This controls the strength of the signal at the Line Out jacks (#37,38) and works independently from the Master control (#14).
  35. LINE OUT PRE/POST SWITCH: The signal at the Line Out jacks can be set to either Pre or Post EQ with this switch. With the switch in the OUT position, the signal at the jacks will be Pre-EQ. This is a direct output not affected by any preamp tone settings. With the switch IN, the signal is Post- EQ and is controlled and modified by the tone controls, Graphic EQ and the effects loop.
  36. LINE OUT GROUND LIFT: This switch disconnects the ground pin of the line Out XLR jack (#37), which may help reduce residual hum and buzz sometimes picked up in line out signal cables. The ground is lifted when the switch is depressed.
  37. LINE OUT JACKS: These jacks supply a pre-Master, line level signal for connection to a house mixing board, recording console or external amplifier(s). The XLR-type jack (#37) provides a balanced signal; the 1/4” jack (#38) provides an unbalanced signal. The signal level at these jacks is controlled by the Line Out Level control (#34) and is governed by the Pre/Post switch (#35).
  38. See 37
  39. EFFECTS LOOP RETURN: When using external effects, connect the effect’s output into this jack using a shielded instrument cable.
  40. EFFECTS LOOP SEND: When using an external signal processor, connect this jack to the input of the effect using a shielded instrument cable.
  41. TUNER OUT: This jack is provided for connection to an electronic tuner and is always “live,” even when the Mute switch (#3) is engaged, allowing for “silent tuning” as well as a monitor feed which remains active when the house mix is muted.

    Specification:
     
Specification:

Wednesday, April 27, 2011

Ampeg BA-115 Bass Amp


Price List Rp.5.125.000
Ampeg BA-115 Combo Bass Amp
When you need a portable rig with legendary Ampeg tone, look no further than the BA-115. This powerful combo features a 100-Watt power section and a single 15" Ampeg speaker that can rock a small- to medium-sized venue. Just plug in and you're ready to rock!

No matter what sound you're after, the Style Control puts absolute tone at your fingertips. With five presets to choose from, and the tone-sculpting capabilities of an onboard 3-band EQ, you'll be dialed in before the drummer can finish setting up his high-hat.

The BA-115's monitor-style, tilt-back design allows you to put the sound where you want it, which is especially handy when you're using the built-in DI for recording or front of house applications. Rock-solid construction and Ampeg thump to go, the BA-115

Specification:
  • RMS Power Output: 100-Watts
  • LF Driver: 1 x 15" Custom Ampeg Speaker 
  • HF Driver: Piezo Tweeter 
  • Preamp: Solid-State
  • Power Amp: Solid-State
  • Tone Controls: 3-Band EQ
  • Mid Tone Control: Style 
  • Balanced Line Out: Yes 
  • CD/MP3 Input: Yes
  • Headphone Output: Yes
  • Dimensions (W x H x D inches): 21 x 21 x 16
  • Weight: 62 Pounds

Tuesday, April 12, 2011

Ampeg SVT 4 Pro


Price List Rp.23.150.000
Ampeg SVT 4PRO Bass Head 
The sound is in your head. You've played countless instruments in search of the ultimate soul mate. Now you need an amp that will speak your sound to the audience. That's where the Pro Series heads live. The majority of Ampeg Pro Series heads feature multi-tube preamps (not a single 12AX7 like many competitors), 5-position mid frequency selection, and Neutrik Speak-On connectors that lock and provide better conductivity. A Mute button lets you change instruments in the middle of a set without the annoying "pop," and a Tuner Out jack that stays active even with Mute button on. Pro Series heads are built for the long haul. The units remain cool with variable speed fans that only turn as the temperature dictates. DC supplied filaments ensure noise-free tube performance. And the 1/8 in. thick extruded aluminum front panels not only allow safe racking, the contoured fronts have an awesome look. The 1200-watt SVT-4PRO is the industry's highest powered bass amp. Your creative mind now has the palette to deliver the goods.
control panels:
  1. INPUT: Connect your bass guitar here using a shielded instrument cable.
  2. TUNER OUT: This jack is provided for connection to an electronic tuner and is always “live,” even when the Mute switch (#3) is engaged. This allows for “silent tuning” as well as providing a monitor feed which stays hot even when the house mix is muted. In addition, this jack may also be used as a -6dB input (when not connected to a tuner).
  3. MUTE: This switch, when depressed, mutes all outputs except the Tuner Outs. This is excellent for tuning your bass with an electric tuner without having to adjust any levels to turn down your house volume. A footswitch can also be used to control muting as long as the Mute switch on the front panel is left in the “out” position. (The front panel switch is still active with the footswitch connected. Please refer to #38, rear panel.)
  4. -15dB: This switch, when depressed, will attenuate the input signal by 15dB. If your bass has active pickups, depress this switch to better accommodate its output signal level.
  5. GAIN: This controls the gain of the preamp. Adjust this control until the Peak LED (#6) flashes on strong signal peaks (but is not illuminated constantly while playing). To obtain the best signal to noise ratio, set the Gain control to the highest possible setting and adjust the Master (#19) to obtain the desired volume level.
  6. PEAK LED: This LED will illuminate when the preamp signal is nearing its clipping level, indicating optimum gain setting.
  7. COMPRESSION: This controls the amount of signal compression. At the fully counter clockwise position there is no compression; at fully clockwise the compression ratio is 10:1. The sonic effect of compression is reduced dynamics, increase sustain and a more consistent output level regardless of how light or hard the strings are played. The compressor is very transparent– that is, there is very little effect on the tone of your instrument.
  8. ULTRA HIGH: This switch, when depressed, increases the high frequency output by 6dB at 5kHz.
  9. ULTRA LOW: This switch, when depressed, greatly enhances the amount of low-end bass tones which you can feel and hear, especially the low E and low B strings (5-string basses).
  10. BASS: This control allows for 12dB of cut or boost at 50Hz. The low frequency output is flat at the center position.
  11. MIDRANGE: This control allows for 15dB of cut or boost at the center frequency selected by the Frequency control (see #12). The midrange output is flat at the center position.
  12. FREQUENCY: This control allows you to select the center frequency for the midrange control (#11), giving you a choice of five “voices” for the midrange.
    The numbers correspond to the following center frequencies as indicated:
    1=220Hz, 2=450Hz, 3=800Hz, 4=1.6kHz, 5=3kHz.
  13. TREBLE: This control allows for 19dB of cut or 14dB of boost at 5kHz. The high frequency output is flat at the center position.
  14. BRIGHT: This switch, when depressed, adds a more lively top end response to the input signal.
  15. GRAPHIC EQ: This switch, when depressed, enables the 9-band Graphic EQ (see #23 and 24). The sound of your bass will only be affected by the settings of the EQ slider controls when this switch is depressed, or when a footswitch is pressed. (A footswitch will override the front panel switch. Please refer to #38, rear panel.)
  16. LINE OUT LEVEL: This controls the strength of the signal at the Line Out jacks (#40,41,44,45, rear panel).
  17. EFFECTS BYPASS: This switch, when depressed, bypasses the Effects Loop. (A footswitch will override the front panel switch. Please refer to #38, rear panel.)
  18. LIMIT DEFEAT: The SVT-4 PRO employs internal limiter circuits to help keep the power amplifier’s output clean at extreme volume levels. (All amplifiers may begin to clip their output signals as they approach maximum output levels, resulting in potentially speaker-damaging distortion.) These circuits may be defeated by depressing this switch, which may result in an increase in output power but with the possibility of distortion. Use discretion whenever playing with the Limit circuits defeated.
  19. MASTER: This controls the overall output level of the amplifier. For the best results, adjust the Gain control as directed (see #5) and use this control to obtain the desired volume level.
  20. LIMIT LED: This LED will flash any time the internal limit circuit is called upon to keep the amplifier’s output signal clean. This indicates that the amplifier is nearing full output and the limiter is keeping it from clipping the output signal.
  21. CROSSOVER FREQUENCY: This sets the crossover point between the Biamp High and Biamp Low Outputs when using the amplifier in the biamp mode. (See page 13.)
  22. CROSSOVER BALANCE: This adjusts the relative level between the low and high frequency biamp signals when using the amplifier in the biamp mode.
  23. 9-BAND GRAPHIC EQ: These sliders control the amplitude of the signal at the frequency indicated below each control. The center position of each control is flat: sliding the control upward will increase the output signal level of that frequency; sliding the control downward will decrease it.
    The Graphic EQ can be used in two ways: 1) To fine tune your sound, make small adjustments at the desired frequencies and leave the EQ on throughout the entire session. (This is great for adapting to varying room acoustics when going from club to club, etc.) 2) For a completely different sound, make larger adjustments and only activate the EQ when you want a “second channel” sound (such as during bass solos).
  24. LEVEL: This is the output volume control for the Graphic EQ and only affects the signal when the EQ is engaged. If the EQ’d signal is too soft, slide the Level control up; if it’s too loud, slide the control down.
  25. POWER LED: This LED illuminates green when the Power switch (#27) is depressed.
  26. ACTIVE LED: This LED illuminates when the Graphic EQ switch (#15) is depressed.
  27. POWER: This heavy-duty rocker switch applies AC power to the amplifier: the amp is ON when the top of the switch is depressed, OFF when the bottom of the switch is depressed.
  28. CIRCUIT BREAKER: The SVT-4 PRO employs an AC line circuit breaker to help protect against damages due to excessive current demands. If the amplifier stops working, check the circuit breaker.
    NOTE: When the circuit breaker opens, the button will be protruding and showing a contrasting color. You can reset the circuit breaker by pushing it in until it latches. The breaker must cool down for a short time before the button will latch. If the circuit breaker opens repeatedly with no signal input, have the amplifier checked by a qualified service person.
  29. AC LINE IN: Firmly insert the supplied AC power cord into this socket until it is fully seated. Plug the male end of the cord into a grounded AC outlet. DO NOT DEFEAT THE GROUND PRONG OF THE AC PLUG!
  30. AC OUTLET (Domestic units only): This unswitched outlet lets you connect any AC powered device (such as an effects unit or an electronic tuner) up to a maximum of 300 watts. The jack is “hot” whenever the amplifier is plugged into a live AC outlet, regardless of the setting of the amplifier’s Power switch.
  31. SPEAKER OUTPUTS: The Speakon® Jacks: Use of these heavy-duty connectors is recommended when playing at full output levels. Connect the amplifier to your speaker cabinet(s) using heavy gauge speaker cables terminated with the appropriate connectors. (See text to left of jacks for
    pinout information.) The 1/4” Jacks: These mono 1/4” jacks (two per channel, wired in parallel) offer you a convenient method of connecting the amplifier to your speaker(s) using cables terminated with 1/4” plugs. (Whenever playing at full output levels, it is recommended that you use the Speakon® jacks).
  32. STEREO/MONO BRIDGE SWITCH: This switch sets the operating mode of the amplifier. In the “out” position the amplifier is in the Stereo Mode; with the switch in the “in”position the amplifier is in the Mono Bridged Mode.
  33. POWER AMP INPUTS: These jacks connect directly to the internal power amp for use with external preamps. When using external sources, connect the OUTPUT of the sources to these jacks using shielded instrument cables to feed the signals into the power amp sections. The internal signal is disconnected when a plug is inserted. In the Mono Mode, Channel A = Input. In the Biamp Mode, Channel A = Low (frequency) Input, Channel B = High (frequency) Input.
  34. PREAMP OUTPUTS: These jacks are direct preamp outputs for use with external power amplifiers, mixing boards, external effects, etc. Connect these jacks to the input jacks of an external amp using shielded instrument cables.
  35. See 33
  36. See 34
  37. EFFECTS BYPASS FOOTSWITCH: Connect a single button footswitch to this jack for remote control of the Effects Loop. Using a footswitch overrides the front panel Effects Bypass switch.
  38. GRAPHIC EQ/MUTE FOOTSWITCH: Connect a two button footswitch to this jack for remote Mute and EQ On/Off control. On the stereo 1/4” plug, the tip controls Mute and the ring controls EQ On/Off. The EQ footswitch overrides the front panel switch and the Mute function is available from either location.
  39. BIAMP HIGH/LOW OUTPUTS: When used in the biamp mode, the Biamp High Out jack connects to the high frequency power amplifier and the Biamp Low Out jack connects to the low frequency power amp. (See pages 12 and 13.)
  40. TRANSFORMER BALANCED LINE OUTPUT JACKS: These jacks supply a balanced signal for connection to a house mixing board, recording console or external amplifier(s). The signal level at these jacks is controlled by the front panel Line Out Level control (#16) and is governed by the Stereo/Mono switch (#42) and the Pre/Post switch (#43).
  41. See 40
  42. LINE OUT STEREO/MONO SWITCH: This switch is active only when the Pre/Post switch (#43) is at the “post” position (switch depressed). When active, this switch governs the signals at the Line Out jacks as follows: In the Stereo Mode (switch out):
    •The Channel A line out jacks (#44,45) supply a signal from the Effects Loop Return Right/A jack (#47).
    •The Channel B line out jacks (#40,41) supply a signal from the Effects Loop Return Left/B jack (#46). In the Mono Mode (switch depressed):
    •The Channel A line out jacks (#44,45) supply a “wet” mono preamp signal – any external effects are applied to this signal. The Effects Loop Left and Right returns are summed together, creating a mono effects signal.
    •The Channel B line out jacks (#40,41) supply a “dry” mono preamp signal – no external effects are applied to this signal.
  43. LINE OUT PRE/POST SWITCH: The signal at the Line Out jacks can be set to either Pre or Post EQ with this switch. With the switch in the OUT position, the signal at the jacks will be Pre-EQ. This is a direct output not affected by any EQ or boost settings. With the switch depressed, the signal is Post-EQ and is controlled and modified by the tone controls, Graphic EQ, the Master level control, the effects loop and the Line Out Stereo/Mono switch (#42).
  44. See 40
  45. See 40
  46. EFFECTS LOOP RETURN LEFT/B: When using stereo effects, connect the effect’s left channel output into this jack. Do not use this jack with mono effects.
  47. EFFECTS LOOP RETURN RIGHT/A (MONO): When using stereo effects, connect the effect’s right channel output into this jack. When using mono effects, connect the effect’s output into this jack.
  48. EFFECTS LOOP SEND: When using an external signal processor, connect the INPUT of the effect to this jack using a shielded instrument cable to send the post-EQ signal to the effect for processing.
    NOTE: The effects loop (#46/47) may be bypassed by the front panel switch (#17), or by the use of a footswitch.
  49. TUNER OUT: This jack is provided for connection to an electronic tuner and is always “live,” even when the Mute switch (#3) is engaged, allowing for “silent tuning” as well as a monitor feed which stays hot even when the house mix is muted.
Specification:
Related Posts Plugin for WordPress, Blogger...
Web Informer Button